Ownership Verified: 1.6 Liters of gayness... '90 MX-5

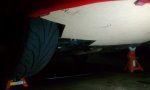
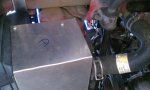
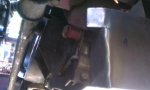
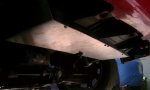
I made some progress toward finishing up. Intercooler is not mounted. Piping is all laid out and cut. I picked up a belt for the Supercharger but it ended up being 2" too short, the normal kits come with the power steering belt from a 2000 Dodge Neon, I need one from a 2000 Toyota Echo or pretty much any '08 Toyota. Belt hunting is so much easier when you can just search amazon for belt part numbers.

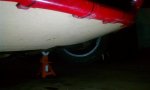
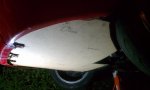
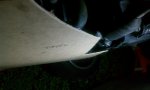
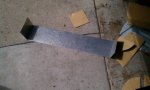
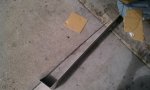
It's mostly 2" piping, anything larger won't clear the hood. The intercooler has 2" in/out anyway, which is off of a 98-00 VW Passat/audi a4 1.8t.

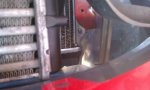
next up, tap the BOV pipe for the vacuum signal for the BOV (it's got a reference boost port), and solve my air filter setup for this thing. Miata engine bay is not well laid out for a rear mounted SC inlet.

https://pic.armedcats.net/t/th/thedguy/2011/09/09/intercooler_piping_001.jpg

https://pic.armedcats.net/t/th/thedguy/2011/09/09/intercooler.jpg
 
Audi a4/passat 1.8t Intercooler is mounted. Used a 3 foot long (only needs about 32") L bracket with an inch on each part.

The 2 studs coming off the frame horns the lower bumper support rods tie to are a PERFECT spot for this to fit to.


the audi IC doesn't have any kind of screw/bolt/stud mounting setup, it just clips into place on those cars. To make it work my cross bar has some slots cut in it and the ic slides into place:


The stud locations:


IC fitted in slots:


IC mounts from top:


completed, the ic pipes hold most of the weight, and they tension the IC into this bracket.
I'll be drilling some holes in the mounts and using a clip/cotter pin to keep it from moving in any direction too much:


Now I just need to throw on a belt, filter element for the IAC and rescale/tune my megasquirt.
 
Last edited:
Hella flush, yo.

I think you should paint the silver bit black to match the rest of the steering wheel. The stopwatch sticks out far enough already.
 
I'll have rob anodize it likely.

Just like to update, I HAZ B00ST!

Sadly my bypass diaphram seems to be blown, or for whatever reason not working at idle. This means I'm CONSTANTLY trying to boost.

Good news: the SC outlet temps are hot enough to damn near burn your hands (again at idle with the bypass not doing it's thing), but post IC, my temps are right about 20 above ambient. With no airflow through them.
 
Last edited:
Alright, so It's running. it's semi tuned with a static timing of 8degrees advance (horribly low). I haven't drained the 87 out of the tank so... it's getting tweaked later.

My JRSC built in bypass appears to not work, my BOV is doing the job of it, just A LOT louder. With both hooked up it just does weird things, I may just have too weak of a vacuum source to it :dunno:

The intercooler is kicking serious ass. Pipe temp on the SC outlet was 126 degrees F, ambient is low 80's right now. Post IC my pipes are sitting at 91F. GM IAT is showing post IC temps of 95 (idle) up to 115 at speed and full boost. Idling the air coming out the bypass was showing 156 degrees F! So without using any math to figure out difference the blower might make based on the engine sucking up more air... I'm seeing 40F temp change through the IC! I have no idea what the boost drop is though.

With some basic fuel curve tuning the car feels really good, runs well, idles well and drives fairly well. I have a feeling my dwell settings are off on the ignition, and I need to rewire my wideband o2 more permanently.

I'll post a video up tomorrow with my go pro, for now I got an audio sample with my phone

 
Last edited:
The difference in sound between yours and mine is stark (at least based on my memory). Yours produces a lot more supercharger whine at low RPM / low boost. Unfortunately, I don't have recordings of my car, but it used a twin screw supercharger. This '95 had a louder exhaust than mine did, but you can hear how little whine there is when he's easy on the throttle:

The music at the end of this dyno run is, frankly, dumb, but it gives you an idea of the sound when hard on the throttle.

Both of those are ubercharger systems, which was Flyin' Miata's packaging of the twin screw that BEGi also sold. The U3 is what was on my car (and on my friend's).
 
Pointless not for me, my sc belt is a 445k4 .

Equiraptor:
Mine it's do loud because I don't have a throttle behind the blower, and the bypass isn't working so my bov is just dumping the air you atmosphere.

Shame they don't still offer the twin screw setup, I'd love to have gone that route. Those are far superior blowers.
 
Well as I'm sick of fighting with my misfire issue, I decided to solve some other problems:

My radiator shroud got fucked up ages ago and now that I will likely be having cooling issues with the SC I figure I might mitigate the problem a bit by fixing it so:

https://pic.armedcats.net/t/th/thedguy/2011/09/23/shroud.jpg

https://pic.armedcats.net/t/th/thedguy/2011/09/23/shroud2.jpg


https://pic.armedcats.net/t/th/thedguy/2011/09/23/shroud3.jpg

https://pic.armedcats.net/t/th/thedguy/2011/09/23/shroud4.jpg

https://pic.armedcats.net/t/th/thedguy/2011/09/23/shroud5.jpg

https://pic.armedcats.net/t/th/thedguy/2011/09/23/shroud6.jpg

https://pic.armedcats.net/t/th/thedguy/2011/09/23/shroud7.jpg


Once I finished that up, I went to work, came back and made this TEMPLATE for a skid plate/front belly pan out of 1/4" mdf. Currently held together with zip ties.
Current plan is to get it all squared away then probably make the real one out of thin sheets of aluminum with a some balsa wood sandwiched in.

https://pic.armedcats.net/t/th/thedguy/2011/09/23/template-center-toward-drivers.jpg

https://pic.armedcats.net/t/th/thedguy/2011/09/23/template-drivers.jpg

https://pic.armedcats.net/t/th/thedguy/2011/09/23/template-drivers-wheel-out.jpg

https://pic.armedcats.net/t/th/thedguy/2011/09/23/template-passengerside.jpg
 

Attachments

  • IMAG0606.jpg
    IMAG0606.jpg
    60.6 KB · Views: 64
  • IMAG0607.jpg
    IMAG0607.jpg
    67.9 KB · Views: 71
  • IMAG0608.jpg
    IMAG0608.jpg
    76.7 KB · Views: 60
  • IMAG0609.jpg
    IMAG0609.jpg
    73.2 KB · Views: 72
  • shroud3.jpg
    shroud3.jpg
    70.7 KB · Views: 63
  • shroud.jpg
    shroud.jpg
    79.1 KB · Views: 69
  • shroud2.jpg
    shroud2.jpg
    89.6 KB · Views: 76
  • shroud4.jpg
    shroud4.jpg
    51.6 KB · Views: 66
  • shroud5.jpg
    shroud5.jpg
    43.1 KB · Views: 69
  • shroud6.jpg
    shroud6.jpg
    35.8 KB · Views: 63
  • shroud7.jpg
    shroud7.jpg
    31.7 KB · Views: 66
Last edited:
Well did an entire weekend at streets of willow. 1 day in the roadster and another morning in "Shitbox."

The starting issues I'm having but me hard in the higher elevation. Hot restarts weren't happening at all. This lead to some fun when my failure to save a spin lead to a stalled engine... And a tow off the track.

Performance wise, the car and my hooligan like driving (read: attempts at drifting the skid pad)
Netted performance on par with stock engined, 6 speed NB's with similar chassis mods. Acceleration was dead even.

Those BP4W's are damn good engines!

Oh my best time was a 1:35.2 going CCW.
 
Updates updates updates!

So supercharger has been ripped the fuck out! I wasn't a fan, too much fuel burned for so little power gains (though was fun). I've since played a lot with getting the megasquirt to make some power and run better and it's doing so quite nicely now :D

Miata's @ MRLS (laguna Seca) has been announced and I went on a bit of a buying spree to make this car stiffer.

First up, the 94+ rear subframe and bracing.
4OafT.jpg


If you're wondering the difference I have a picture of the new subframe installed with the old one in frame
You'll notice tabs on the one in the car that aren't on the one on the ground.
R1Zgo.jpg


This is the subframe completed. I did this install by disconnecting what I had to then dropping the whole rear end, transferring everything to the new one and throwing it back in the car. Total time was a little under 4 hours
eBEE7.jpg


Ordered from 949racing some endlinks, carobotech brakes (my axxis ULT were down to about half a millimeter left.)
xh4CS.jpg


Ds1F4.jpg


Flyin' Miata Butterfly brace (I already had the frame rails)
and the thing in black is the canon brace.

WrwM1.jpg


The rails that go with the brace that I've installed ages ago
D4wCU.jpg
 
Real sports cars have leaf springs in the rear. Just saying. :p
 
Hmmh, I actually didn't know the 94+ has different subframe. Damn, I've ripped my subframe from the car and it's going to be sandblasted in couple of weeks when I've got enough time. Oh well, when I find cheap 94+ subframe I'll have to swap it, not enough time to import one from Britain.

I'm really waiting to hear how big improvement the butterfly brace makes. In theory it should be pretty big impact since it closes the transmission tunnel which is great for rigidity, but I've heard the difference is not as big as stock vs frame rails?

I've had the frame rails and roll bar for so long that I've forgotten how bad a stock one was until I drove my roommates a while back. I imagine I won't notice a huge difference since I have the aforementioned other bracing. We'll see in a few days.
I'm going to have a friend tack weld in the bolts that hold the center 8 bolts for the butterfly section. This will effectively make them studs and hopefully make removal/installation a lot easier when yanking it out for other things.
 
Welp! I just figured out a big problem with my subframe swap...

The 1.6 catback won't clear, the exhaust hanger on the subframe is moved further toward the drivers side of the car (passenger for those countries that still recognize the Queen except Canada)!

Looks like I'm going custom.
 
I'm working on ideas to secure the bolts for the FM frame rails so they are more like studs. Having to pull the carpet up everytime I want to fiddle about under the car is going to be a pain. I've considered welding but I'd have to rip out the entire carpet to do it without catching anything on fire.

Suggestions? I've contemplated rivet nuts, or perhaps a very thin nut between the frame rail and butterfly center section :dunno:
 
So I started off with this today.
EN2TP.jpg


and these arrived, boss frog front arms and beat rush ppf-subframe brace

UkASY.jpg


Finished installing my carbotech xp8 brakes on 1.8 rotors, stainless steel braided lines, and 949 adjustable endlinks
vpbtW.jpg


took out the inside run of bolts/ nuts on my FM frame rails and installed nut serts/rivet nuts. These things are pretty sweet.
You drill a hole the size of the outer body, put the tool in it (basically an unthreaded nut) and a bolt in it, synch it down and it compresses like a rivet but it has threads. It's commonly used to allow composites to have threaded area to put a bolt in.

The FM way used 5/16th bolts that required removing seats and the carpet to release these bolts and drop the butterfly brace.

K_series_rivet_nut.jpg

Installed view of side I'll be using
e8v8D.jpg


hidden side.
xACcs.jpg

And finally the finished product. It's a 3 piece design, the center (small section) is removable, though it's kind of a PITA.
LDRAA.jpg
 
Top