3D Printing

Crosspost.

Speaking of which, is it possible to 3D print with transparent material and would you make a lid for my KitchenAid bowl? They don’t sell one for the odd size I bought, so I’ve been meaning to ask for a while.

Kind of, maybe, not really. Firstly it depends on the size, the absolute maximum diameter I can print is 15cm. @leviathan 's Prusa Mini is apparently up to 18cm. Sticking thick, flat parts together isn't very practical. Not in a way that ensures they won't just come apart, anyway.

Extrusion based prints aren't designed to be fully solid right from the start, the print would need to be at 100% infill to make it 'solid'. Even then it isn't completely solid because the infill printing isn't designed to overlap, nor is the software I use designed to allow it. CURA can do it, but I don't think that's compatible with my machine. This guy made a guide in 2018 if you're interested:

https://fenneclabs.net/index.php/2018/12/09/3d-printing-transparent-parts-using-fdm-fff-printer/

Assuming it was possible to achieve the right amount of overlap, it would need a lot of sanding to make it transparent. Then there's the issue of material properties. I exclusively use PLA and that softens relatively quickly, as I found out when I left my Smart in the sun in Italy and the shifter paddle extensions went all soft and warped. We had to flatten them out with pan and hair dryer. Anything warm in the bowl would cause it to soften, even a small amount can cause warping. PLA isn't food safe either.

A resin printer is more likely to get a good result but can only print small items and it's expensive. it's also very not food safe.

If I wanted a custom lid I'd personally be looking for someone to make one out of thin wood, cut to the correct size circle and routed to make it fit (tapered, with a lip for the top of the bowl or a channel for the rim). Then painted with food-safe paint.

TL : DR it's difficult, you probably wouldn't like the result and it might poison you. :p
 
There are some tutorials floating around, and something like this could actually work: https://www.printables.com/model/15310-how-to-print-glass

He suggests using clear PETG, which is also a material that happens to be food-safe. I never tried this, but I do have some clear PETG in store, so might try a small part these days, just for fun.
 
TL : DR it's difficult, you probably wouldn't like the result and it might poison you.

Thanks very much for the explanation! Not TL, did R. 😉 The food safety issue definitely means it’s not an option, so I guess I’ll have to write to KitchenAid and ask if I’ve simply been searching in the wrong places.
 
Realised today that I had an entire spool of PETG that I bought almost three years ago and didn't use. I think I was scared that my machine wouldn't be able to print with it so didn't even try. Ended up trying to today and got decent results.

I'm trying to replace the USB HDD dock that I have for the disk out of my Atomos Ninja, the one I posted about in 2020. USB 3.0 is too slow with these file sizes so I want to replace it with a SATA dock. I can't find a SATA or eSATA enclosure that will accommodate the Master Caddy in any way, so it'll have to be a 2.5" SATA bay using eSATA and USB power. That means that the Ninja is going to have to accept a 'raw' SSD. Thankfully someone already made a solution and offered it on Printables.

1662764430458.png

https://www.printables.com/model/44431-tool-less-ssd-adapter-for-atomos-ninja-v-w-extra-c

It says PETG is better, so that's what I used. Mine isn't as perfect as the one above but it's functional. I was impressed with how flexible it was.

IMG_3871_S1920.jpg
IMG_3872_S1920.jpg


It's not as good as this version either, but I'm not trying to charge $40 for about 7 grams of PETG!
https://freshmasdesigns.com/shop/p/fresh-ssd-ninjav

I'll be ordering some new parts for the printer this weekend, a Mk10 extruder mount so I can finally fit the Mk10 extruder I've had for a long time, and some stainless steel nozzles. I may re-print this part when those are fitted and see how much better it is (or isn't) with the tighter tolerances, this nozzle is still very much reamed out from the carbon fibre PLA I used. It just keeps working though.
 
I got the rest of the Mk10 extruder parts and it's kind of been a disaster. In trying to use the original thermocouple with the new silicone hot end cover the copper ring end broke, a screw-in replacement I bought had wildly different temp readings, I ended up using the one from the other extruder (mine was originally a dual-extruder machine) but I don't trust it.

I can't get PLA to stick to the bed for some reason, PETG needs a massive temp increase to not have the layers separate. I'm not having fun.

I bought a cordless soldering iron from Lidl and wanted to convert it to use Makita batteries. I needed to add a 10K resistor to fool the overtemp sensing and then I printed this adapter:

https://www.thingiverse.com/thing:2472385

It was a very messy print.


I thought the Einhell batteries were the same but they aren't. Not wanting to waste all of the print, I just cut the top off and screwed it to the Parkside tool with some hot glue as a backup. The electrical connections are done using wires soldered to the battery connections of the Parkside tool and attached to the battery blades I fabricated using ring terminals. It's a bodge, but it works.


It's a decent iron, especially for only £12. Mine gets up to almost 600C according to my Hakko 191 thermometer.
 
Now the 3D printer is kind of working reliably again, albeit at 240C for PETG, I made a part for my audio mixer.

It has green LEDs at the top for displaying the A or B selection on each channel, visible in this picture:
1668034316720.png


They're really bright and distracting, being a the top. Unlike the power LED, they aren't mounted flush to the front panel and protrude, so using LightDim stickers doesn't work.

I had a piece of black styrene over there for a while, mounted using the top-centre screw shown in the photo above. It occurred to me that I originally wanted to put labels on each channel. I stopped because I've seen what the Epson sticky labels can get like after they've been on something for a while - the top clear layer comes off and leaves the label behind in a patchy mess.

The styrene piece wasn't full length, so I couldn't just add labels to that. It's in the background of some of my bobtail dashboard build photos. I took the chance to model and print a fitted cover for the lights, with recesses for the LEDs. Modelling was easy, I took the measurements from the styrene piece and slapped the hole in the middle with fingers crossed that it would be in the correct place.

MixerCover.PNG


It came out well, I printed it upside down as shown above so I didn't need to support the recesses but it meant that I couldn't chamfer the hole for my countersunk screw. I used 5 shells to give myself plenty of meat to countersink, which worked fine. The bottom/outer side was sanded and polished up to a satin finish, then the labels applied.


I would've preferred white labels but I don't have any white label tape, just this yellow or the clear I used on bobtail dashboard. It's fine.

A reminder for what you're seeing there with the outputs, for those who are curious:
  • Inputs 1, 2 and 3 are from my second PC (I play streams on it sometimes), the T2 radio tuner and the second tape output on the A1 amplifier. They all go to output 1, which goes to the line in on my main PC.
  • Input 4 comes from the headphone/speaker output on my TV
  • Input 5 comes from the Optical DAC that is in turn connected to my PC. Inputs 4 and 5 go to output 2, which goes to the A1 amplifier as the aux input.
 
I've been doing mostly home improvement / decoration stuff in the new apartment with the printer recently.

Some of the projects, probably missing a few smaller ones:

IMG_1864.jpeg IMG_2280.jpeg IMG_2282.jpeg
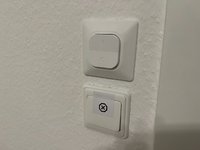
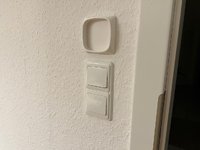
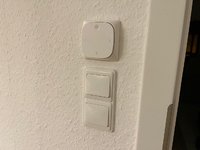
Housings for Ikea Tradfri and Styrbar (designed by myself) Zigbee light switches.

IMG_2273.jpeg IMG_2267.jpeg IMG_2263.jpeg IMG_1892.jpeg
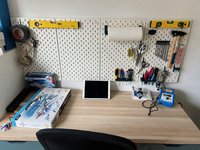
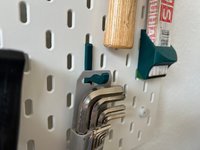
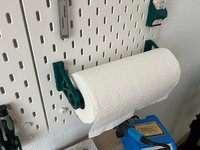
Ikea Skadis tool holders (+ hooks, more hooks, kitchen paper roll holder, screwdriver holder) for the workshop, and Oculus / gamepad holders for the computer desk.

IMG_2361.jpeg
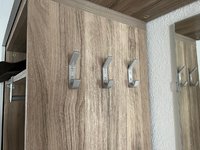
Coat hooks.

IMG_2463.jpg IMG_2464.jpg
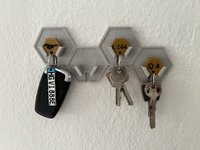
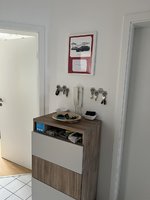
Key holders, to prevent them from piling up and me being unable to find any.

IMG_2274.jpeg IMG_2275.jpeg
And possibly my pride and joy - cloud storage.
 
If the location of a printer has to be in a small spare bedroom with expensive -but-delicate oiled wood floors, and where the only ventilation is a window on the opposite wall, I have no business looking at resin printers, right?
 
Last edited:
Yeah, resin printers need good ventilation and you really don't want it in a room where you spend a lot of time. Bedroom is probably close to worst possible case :) I am thinking about one as well, but only location I'm currently considering is in the cellar, with a duct to the window for extra airflow.
 
… that reminds me I need to build something to replace / bodge one of our basement windows to have a powerful fan on it, ideally while keeping it rainproof (typical basement window shaft thing, so not too hard to achieve). Realistic size for home 3d prints is usually max 25x25 cm or sth thereabouts, right? That’d probably make wood the material of choice, I guess…
 
I bought a big Rhino carbon filter for my resin printer when I was using it, did the job of removing smells but you should still keep the area ventilated.

Resin is messy and awkward, I wouldn't recommend it unless you really need the detail. They are very quiet, I suppose.
 
Bummer. Yeah,, that's what i feared.

My near-tearm goal would be to use it to print pieces that would be used to make silicone molds for making things out of concrete. So a resin printer seems like really the only viable option, as a filament printer's output would require lots and lots of post-processing to get smooth surfaces, which can be incredibly difficult with some geometries.
 
Could you make the 'buck' out of multiple parts? That would make the sanding easier and could allow you to maximise the surface quality. This video shows multi-part bucks being made for sand casting, I know it isn't quite as simple for silicone though.


View: https://www.youtube.com/watch?v=Re_pmfWgMVw
Filler primer and glazing putty would be your friend too with any 3D print casting.
 
Friend of mine has got into 3D printing and selling little dragons and such like at craft shows, often using pearl metallic filaments that change colour throughout the print. While not my thing, they're very impressive. I've suggested that he tries some clear or partially clear ones with RGB LED modules inside.

He recently bought a Bambu Lab P1S to go with an Ender 5 and I hadn't heard of Bambu Lab before, but I'm extremely impressed with the results. I'm even more impressed with the results and features that come with the X1 Carbon. Stuff like the better camera and automatic flow calibration. As such I think I'm going to end up buying an X1C to replace my ancient CTC machine. It's massively more expensive and I absolutely can't justify the cost, but when did that ever stop me? I've always liked the idea of selling my Makita battery mounts but the prints from the CTC machine were nowhere near good enough, I'm not saying I will definitely start selling prints but it's good to know that the quality would be high enough.

The AMS is a feature I really like over other printers. I initially thought that the AMS would be a filament splicer like the Palette but it isn't, so it does waste some filament in use, but the pros outweigh the cons.

If you can bear to sit through it, Ben Heck has just done a great review of the X1C, warts and all.

View: https://youtu.be/hHx2H-IPeBw
 
Friend of mine has got into 3D printing and selling little dragons and such like at craft shows, often using pearl metallic filaments that change colour throughout the print. While not my thing, they're very impressive. I've suggested that he tries some clear or partially clear ones with RGB LED modules inside.

He recently bought a Bambu Lab P1S to go with an Ender 5 and I hadn't heard of Bambu Lab before, but I'm extremely impressed with the results. I'm even more impressed with the results and features that come with the X1 Carbon. Stuff like the better camera and automatic flow calibration. As such I think I'm going to end up buying an X1C to replace my ancient CTC machine. It's massively more expensive and I absolutely can't justify the cost, but when did that ever stop me? I've always liked the idea of selling my Makita battery mounts but the prints from the CTC machine were nowhere near good enough, I'm not saying I will definitely start selling prints but it's good to know that the quality would be high enough.

The AMS is a feature I really like over other printers. I initially thought that the AMS would be a filament splicer like the Palette but it isn't, so it does waste some filament in use, but the pros outweigh the cons.

If you can bear to sit through it, Ben Heck has just done a great review of the X1C, warts and all.
If you are a frequent printer, I would recommend going with the X1C. It's pretty much replaced my MK3s+ and handles materials much better than I expected. It's fast, handles TPU without looping out of the extruder gears, and "just works". A few bugs, and the 6 minute pre-print bed leveling is a bit annoying, but so far so good.
My justification on the cost was "I can continue to spend more time fixing and unfucking the printer than actually printing at this point, or spend the money to get good quality prints and free up my time elsewhere.". The spaghetti-checker has saved me a few prints so far, and the lidar-first level checks are pretty solid.
Thanks for the insight. After nearly 8 years of using, abusing and nursing this CTC Makerbot clone I feel like I can justify something better. It still works fine as a draft printer and it was never expensive to begin with, but I'm just not satisfied with the print quality now and it puts me off using it.

First layer, bridging and cleanly removing support material have always been the tricky points with this machine.
 
Have you ever experimented with using an easily-removable material for your support? Like either the "dissolves in water" type or a "flexible" type, which seems to just cleanly pop right off (in the couple of videos I've seen where they used it)?

I'll note that I have ZERO experience with 3D printers other than the Dremmel machine at my library, which I've printed successfully on, with a 35-minute print, exactly once. 🤣
Yes- tried using PVA, which is "water soluble". Imagine slowly cleaning off elmers glue underwater that gets thicker and multiplies underwater-- it's slow, and unpleasant..
Newer slicers have updated their gaps and supports so that single-materal PLA/TPLA/TPU/PC can "snap" off the print with little residual. It's getting better, but not perfect.
 
Yes- tried using PVA, which is "water soluble". Imagine slowly cleaning off elmers glue underwater that gets thicker and multiplies underwater-- it's slow, and unpleasant..
I still have a reel of that, back when my machine actually had two working extruders. It wouldn't even feed correctly. I would be more interested in a type of PLA that degrades fast when exposed to strong UV, so it basically just crumbles.

The Prusa slicing used with the Bambu machines definitely seems better that the Makerbot slicing I've been using forever.
 
Couldn't decide if I should post this here or in the Starfield thread, as I wrote more it seemed like here made more sense.

I've pre-ordered a Bambu A1 Mini with AMS lite, for the printing I do I just couldn't justify an bigger machine and would really benefit from the quieter operation of the A1 Mini. It'll be behind me in the place I'm sitting now, in quiet mode I can probably run it while working. I've also seen that the AMS lite can be mounted above the printer, which is perfect as I have a pegboard there.

You know that I like difficult and ultimately pointless projects, so I've decided that when I get my printer I'm going to 3D print my modified Shieldbreaker. As such, I've exported every component using ce2utils, converted the OBJ meshes to usable 3MF files as much as possible (there are lots of additional meshes in the original export that cause problems) and assembled them in 3D builder to check them.

Screenshot 2023-10-21 000315.png

Screenshot 2023-10-21 000541.png


I believe all the parts exported in metres, but I imported them into Fusion 360 as centimetres so it's a 1/100 scale model. At this scale, the entire model would be 71.3cm long! 71.3m seems realistic for the full-size ship. I do not have the space for that model and the 3x1 hab in the centre is too big for the 3D printer at that scale, so I'll most likely do 1/8 or 1/6.

Some parts, such as the engine ports, wouldn't export with full detail. If they're painted it won't be all that noticeable. The idea would be to join the modules together with neodymium magnets, which can also transfer a small voltage to power LEDs. The reactor would be the power source, naturally. That makes the closed off engines less of an issue, as I can print those faces in transparent filament and just put a hollow tube through the part to insert an LED from the back.

I could print many of these parts completely hollow, not sure if that's a good idea yet. I'll need to experiment when I get the new printer.
 
Last edited:
Top