Shadowness
Well-Known Member
Ok, here goes!
What you will need:
- your logo
- a photo
- imaging software eg. photoshop
Firstly....
The way I do this process is to add the logo at the very last step before you post it on the net. So when you add the logo, you will have already re-sized, edited and processed the photo to your liking.
So the way I will describe how do to this is by having a photo that is already re-sized and processed, which will then require my logo as the final step.
So hopefully, by the end of this tutorial, you will be able to add your own logo with just one click of your mouse!
Your Logo
Many of you have your own personal logo. For the purpose of this tutorial, I will be using the logo as shown below in the final image:

Step One:
If you are confident that you can make your own logo in a PSD or you already have one, you can skip this step (but you may as well read it for the hell of it!!)
So firstly, I made my logo out of two lines of text as shown below: (note the two text layers in the layers tab on the right)
(Also, ignore my actions, they are my already made actions and DO NOT relate to this tutorial)
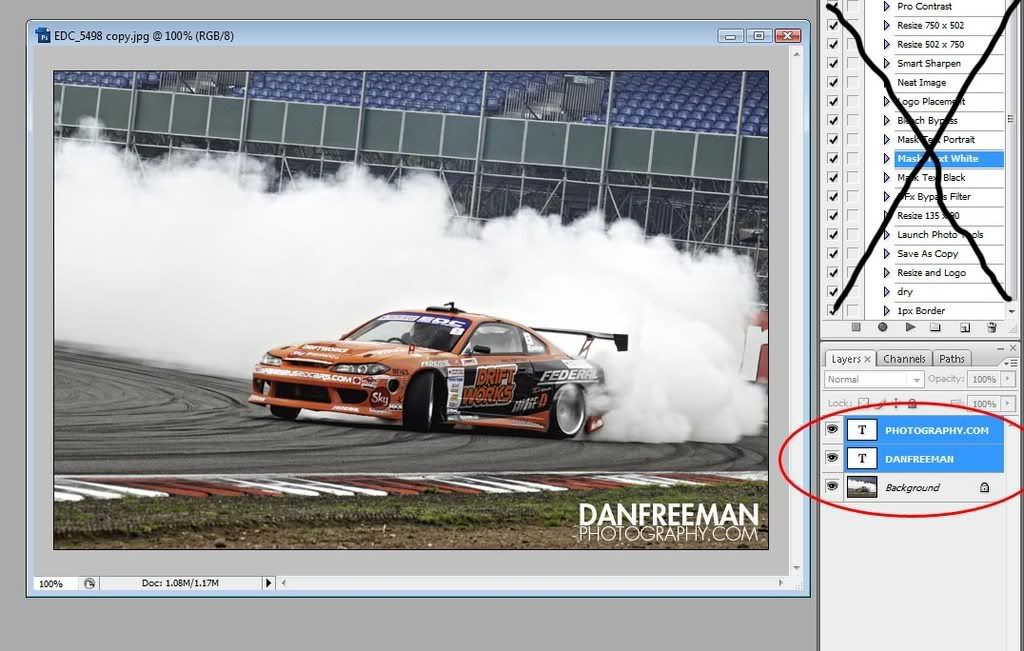
Next you will want to transfer the logo (both lines of text) to a new window. Open a new window, (which will comfortably fit the logo in) and select the Move Tool (V). After selecting the two lines of text (in my case) you can simply drag the logo from the image window to your new window. You should see a plus sign when you drag onto the new window.
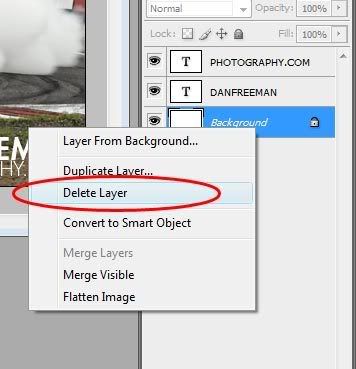
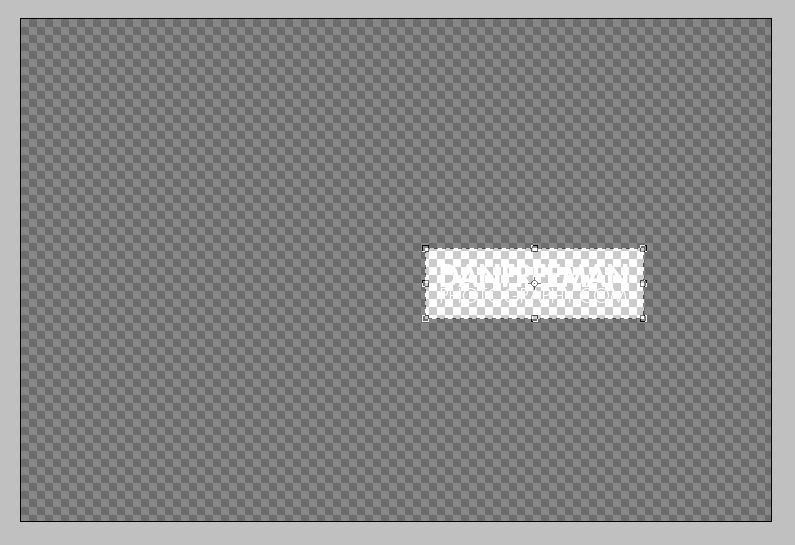
If like me, you made your logo out of white text, you probably wont see anything in the new window (assuming your background colour is white!) So we have to delete the background layer. You will have to do this anyway, as you want a transparent background against your logo, so when you transfer the logo onto the photo, you wont transfer the background too.
So select the new window you created (which should now have your logo in too) and right-click on the background layer --> Delete.
Just to tidy it up a bit, you can crop tightly around your logo. (Crop Tool = C)
For simplicity later on, you should combine both layer of text into one layer. To do this select both layers of text, and right-click --> Convert to Smart Object.
Next, save your logo. Preferably as a PSD file. Advantages of saving in this format are:
1) You can edit the file if you wish
2) No quality loss due to compression etc.
So by now you should have your pre-made logo, and a photo (RE-SIZED) you wish to add the logo onto

Step Two
Ok, so know we get to creating the action for adding the logo onto the photo.
But first, a quick tip for quickly opening your logo via an action.
Click 'Create New Action'

Name it something along the lines of.....'Open Logo', then click Record.
Photoshop is now recording what you do, so get it right the first time!
Go File --> Open (Ctrl + O)
Navigate to your LOGO.psd file.
Click Open
Click Stop Recording (as shown below)

So now, if you close your LOGO file, then click on the Open Logo action, then click Play - your logo file should open. So now you dont have to navigate to your logo file everytime you want to add a logo.
Ok, so now you will need to create a new action. Name it Insert Logo (or something similar), and click Record.
Firstly, select the logo window. The action should have updated with a new entry called 'Select Next Window'
Next, select the entire logo layer (Ctrl + A), then Copy this layer (Ctrl + C).
By now your action script should look like this:

Next, Select the image window (this is important, as the action needs to know which window the logo will be copied into)
Paste the logo into the window (Ctrl + V). Your logo SHOULD now appear in the centre of your photo.

The next step is to TRANSFORM your logo into the correct position on the photo. NOTE: DO NOT just drag the logo into position. This will not be recorded in the action script, so you have to use the transform tool.
Select the transform tool (Ctrl + T). A grid should appear around your logo.
Now drag the logo into the desired position.

Then click the green tick at the top of photoshop:

The action should update to recognise the move.
Click Stop (square icon)
The action script should look similar to this:
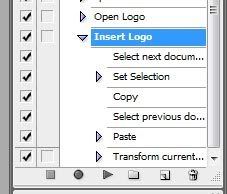
AND THAT'S IT!!
So now, if you open a new photo and resize it, you should only have to click on the new action and your logo will magically appear in the correct postion with just one click!
NOTE: For the action to work, the logo.psd file MUST be open, as you have reference to that file specifically in the script.
I did my best to explain this, it's pretty hard to work out which parts need the most attention. I have assumed the user has a fairly adequate knowledge of photoshop already
Have fun, and I hope that has helped at least one person!
The sun is shining (for the moment!), so I'm going out for a nice long bike ride!
- your logo
- a photo
- imaging software eg. photoshop
Firstly....
The way I do this process is to add the logo at the very last step before you post it on the net. So when you add the logo, you will have already re-sized, edited and processed the photo to your liking.
So the way I will describe how do to this is by having a photo that is already re-sized and processed, which will then require my logo as the final step.
So hopefully, by the end of this tutorial, you will be able to add your own logo with just one click of your mouse!
Your Logo
Many of you have your own personal logo. For the purpose of this tutorial, I will be using the logo as shown below in the final image:

Step One:
If you are confident that you can make your own logo in a PSD or you already have one, you can skip this step (but you may as well read it for the hell of it!!)
So firstly, I made my logo out of two lines of text as shown below: (note the two text layers in the layers tab on the right)
(Also, ignore my actions, they are my already made actions and DO NOT relate to this tutorial)

Next you will want to transfer the logo (both lines of text) to a new window. Open a new window, (which will comfortably fit the logo in) and select the Move Tool (V). After selecting the two lines of text (in my case) you can simply drag the logo from the image window to your new window. You should see a plus sign when you drag onto the new window.
If like me, you made your logo out of white text, you probably wont see anything in the new window (assuming your background colour is white!) So we have to delete the background layer. You will have to do this anyway, as you want a transparent background against your logo, so when you transfer the logo onto the photo, you wont transfer the background too.
So select the new window you created (which should now have your logo in too) and right-click on the background layer --> Delete.

Just to tidy it up a bit, you can crop tightly around your logo. (Crop Tool = C)

For simplicity later on, you should combine both layer of text into one layer. To do this select both layers of text, and right-click --> Convert to Smart Object.
Next, save your logo. Preferably as a PSD file. Advantages of saving in this format are:
1) You can edit the file if you wish
2) No quality loss due to compression etc.
So by now you should have your pre-made logo, and a photo (RE-SIZED) you wish to add the logo onto

Step Two
Ok, so know we get to creating the action for adding the logo onto the photo.
But first, a quick tip for quickly opening your logo via an action.
Click 'Create New Action'

Name it something along the lines of.....'Open Logo', then click Record.
Photoshop is now recording what you do, so get it right the first time!
Go File --> Open (Ctrl + O)
Navigate to your LOGO.psd file.
Click Open
Click Stop Recording (as shown below)

So now, if you close your LOGO file, then click on the Open Logo action, then click Play - your logo file should open. So now you dont have to navigate to your logo file everytime you want to add a logo.
Ok, so now you will need to create a new action. Name it Insert Logo (or something similar), and click Record.
Firstly, select the logo window. The action should have updated with a new entry called 'Select Next Window'
Next, select the entire logo layer (Ctrl + A), then Copy this layer (Ctrl + C).
By now your action script should look like this:

Next, Select the image window (this is important, as the action needs to know which window the logo will be copied into)
Paste the logo into the window (Ctrl + V). Your logo SHOULD now appear in the centre of your photo.

The next step is to TRANSFORM your logo into the correct position on the photo. NOTE: DO NOT just drag the logo into position. This will not be recorded in the action script, so you have to use the transform tool.
Select the transform tool (Ctrl + T). A grid should appear around your logo.
Now drag the logo into the desired position.

Then click the green tick at the top of photoshop:

The action should update to recognise the move.
Click Stop (square icon)
The action script should look similar to this:

AND THAT'S IT!!
So now, if you open a new photo and resize it, you should only have to click on the new action and your logo will magically appear in the correct postion with just one click!
NOTE: For the action to work, the logo.psd file MUST be open, as you have reference to that file specifically in the script.
I did my best to explain this, it's pretty hard to work out which parts need the most attention. I have assumed the user has a fairly adequate knowledge of photoshop already
Have fun, and I hope that has helped at least one person!
The sun is shining (for the moment!), so I'm going out for a nice long bike ride!
