The "i made dis" thread

Yup, I bought a Dremel one some time ago. If the chuck in the power drill in my press holds it, I’ll try it that way; if not, I’ll have to find a way to hold the Dremel in the press.
I always have one of these on standby for small drills. Cheap and available everywhere.
51ve6Hah2UL._AC_SL1000_.jpg


With the Dremel glass bit it’s worth keeping in mind that a Dremel runs much faster than a drill press so it might be slow going.
 
Edit: Oh I keep forgetting to comment on those amazing paint jobs @shad_68, I can't really get my head around painting like that. Those prints look like powder bath prints due to the texture on them.
Thanks! Like everything it just takes practice. I've been doing this on and off for over 10 years, and more consistently as one of my main hobbies the last three years. Though it certainly doesn't have to take that long to get to a proficient level.
These days there's tons of great YouTube channels with really good tutorials explaining and showcasing techniques and even explaining stuff like the art theory behind color choices and the like. I've seen people get to incredible levels in relatively short time (within a year).
If you're interested, I threw together two galleries with WIP images that might help understand how these paint jobs come together.

View: https://imgur.com/a/98JOw4i

View: https://imgur.com/a/R3vfuNQ

The prints are actually SLA resin prints, which is the standard for minis since you don't need any durability and even relatively cheap printers can get great visual quality results. Fun fact though, these print were done by shapeways and the reason I got duplicate sets is because the original prints were incredibly bad. Like, bad by hobbyist levels and completely unacceptable for a professional service. So I asked for and got new prints that were still not great, but much better. I then went and sanded down all the print lines on the original ones with okay success.

This were the original prints:
wSQa8H5.jpg


And the replacements:
sL7wtcG.jpg
 
Last edited:
Another one of my technology hacking posts!

In 2020 I 3D printed and assembled this:


It's a mount to fit a USB SATA docking station into the supporting bracket of my desk speaker shelf, primarily so I could plug the Atomos Ninja SSD into my PC while it was still in its caddy.

While it worked, I was never happy with the performance of that thing as the USB bus just couldn't maintain the transfer speed. Either that or the USB SATA dock was just crap. Either way I've wanted to replace it with a direct SATA connection for some time. The trouble was, how to do that. SATA cables aren't very long and aren't designed to be used over long distances. I have used eSATA in the past with good results, and I found that Startech are now producing a 1.8M eSATA to SATA cable. Perfect.

Startech also produce a 2.5" SATA dock with a flip out door and integrated status light, designed to fit in an expansion bay in the back of a computer. That was my starting point. I grabbed one when it was at its cheapest Amazon price, along with the long cable and an eSATA back plate. I must've had several eSATA plates in the past but couldn't find any, I suspect they got thrown away because I didn't expect to use it again.

So begins the build process, which kind of turned into a saga at the end. As usual, it's documented in pictures.

The first stage was creating a new bracket. The bracket that came with the tray was intended for a computer expansion bay and was honestly too nice to cut up. So I grabbed some spare sheet metal and made a new one. This is the other speaker shelf, flipped around so I'm presented with a fresh bracket... which I cut a dirty great hole in.


The tray fits on nicely. This was supposed to be the final position *foreshadowing*.


When the bracket and cable arrived, I went ahead and tested the setup. While a normal SATA or 4-pin Molex connector provides 12V and 5V, 2.5" disks will generally be fine with just 5V. Here I'm using an old fan coupler to power the disk from my bench power supply. It works perfectly.


This is the spaghetti of bracket and eSATA to SATA cable.


I wanted the eSATA bracket to disappear at the back of my machine, so I made a black rear plate using one of the blanks my case already had. I also didn't like the fact that the eSATA plug barely fitted and touched the insides of the slot.


I then did as the Rolling Stones did and painted it black. Well, actually I coloured it in with a black Sharpie but it works and makes the cable just disappear in the darkness.


Another shot with the black cable and new bracket.


I set SATA port 1 as hot-swap, the same way I did on my server for the backup drive bay. With the cable run up from my PC and the disk powered from the bench power supply again, I could see how well the thing performed with over 2M of cable between the SATA port and the disk. As I hoped, it was as good as a SATA SSD can get in sequential reads and writes. As I'm transferring over big files this is all I care about.

eSATABenchmark.PNG


It also didn't draw much power, good as I ultimately intended to power it from USB.


Things were going well. Now I needed the USB power. I had this little Molex connector from... somewhere with quick-fit cables. As the cable is pushed into the slot it cuts the insulation, the same way a network cable is punched into a patch panel socket. Very handy.


I was originally going to just use a USB cable, but the first one I tried had cables too narrow for the blades to cut through the insulation and reach the copper. I didn't feel like wasting any more cables so I went modular, using a barrel plug socket and some thicker wire. They're glued down here to stop them flapping about. By the way Kingston SSDs are crap, this one is relegated to backup and testing duties where it may be killed accidentally.


Tested and working, I put the shelf back. It didn't work. I took it down and checked it again, fine. Back up, dead. I thought there could be some grounding issue with the metal desk but I eventually came to realise that this thing doesn't work upside-down.

It was not my original intention to have it upside-down, I just placed it that way when marking the screw holes to screw bracket to the shelf. It isn't completely symmetrical, so I just ran with it.

I had to re-mark the holes to move the bracket over slightly, hoping that I would mark and drill them in the right place and this wouldn't turn into an even bigger hassle. Fortunately, it worked out and the tray was finally mounted rightside-up. This is better for the power cable but it does make the release latch hard to reach.


Finally it was back in place. This is a much neater approach to what I did before, the SSD goes in nicely and without having to wiggle it. The tray is actually better this way around, opening away from me. The little LED only lights when there's a disk in, so it isn't constantly dazzling me like the old one did.


It's obviously much faster than the old dock and looks much nicer, although I'm still proud of my work to make the old unit and add a strand of optical fibre to carry the status LED from the circuit board to the front panel.

This is the reason I 3D printed the bare SSD holder for the Ninja V, as I knew I would be going down this route.
 
The dogs are getting old and staring to struggle with the deck stairs. It might be their eyes or arthritis, but I can't risk them getting stuck outside in freezing weather. Something had to be done.
PXL_20221123_003030260.jpg


Loving my mieter saw and flood lights.


PXL_20221123_002949802.jpg

Please excuse the lack of finishing on the sides, I ran out of staples. I didn't want to make another trip to the hardware store and try to do finishing work in full darkness and cold temperatures.
PXL_20221123_002939705.jpg

Yes, I know the deck needs stain, the end of the season got away from me. If we get a warm enough weekend I will get some on there.
 
Last edited:
You’re a good pet owner. 🥰
 
5B7D5CE0-8F59-44C5-A56D-7F7FE1344BBC.jpeg

New Desk for the wife with a weirdly shaped cutout for the radiator. 260x80cm. Braced with a slim beam underneath to keep it from sagging and bolted straight to the wall in the far corner. Will continue the birch along the shelves on the wall so it looks nice. When I can be bothered. Too much else to do…
 
Yesterday was the first day of school for this semester, and was the first art class I've taken since the early 90s. Our first-day task for this Beginner Drawing class, before any instruction, was to use https://paint.js.org/ to make a landscape (foreground, background, and sky), and we were only to take one stab at it: no starting over. I haven't drawn for the sake of drawing something in what feels like 25 years, and this program feels even more limiting than the mid 90s Windows Paint program.

Behold, losers, I did a art:

Castle on mountain in valley 8.png


Now I just gotta find an old van on which to air brush this on the side.
 
Yesterday was the first day of school for this semester, and was the first art class I've taken since the early 90s. Our first-day task for this Beginner Drawing class, before any instruction, was to use https://paint.js.org/ to make a landscape (foreground, background, and sky), and we were only to take one stab at it: no starting over. I haven't drawn for the sake of drawing something in what feels like 25 years, and this program feels even more limiting than the mid 90s Windows Paint program.

Behold, losers, I did a art:

View attachment 3568241


Now I just gotta find an old van on which to air brush this on the side.
OK, I think I like this one better. It technically isn't as much of a "landscape", so I think I'll turn in both, just in case. 🤣

3D 6.png
 
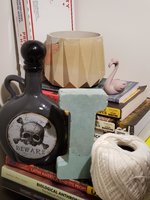
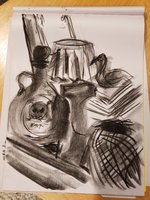
Goddamn, do I ever hate drawing with charcoal. I just don't have a place in my home for such a huge mess. I put down a drop cloth to catch all of the falling dust, and just opening the door created enough wind that it blew charcoal onto the white-ish painted wall. I must have washed my hands 2 dozen times to the point where my skin is cracking, and my fingertips are still shiny silver.

But while most of the exercises have been crap, I really liked how this one turned out:
20230214_220321.jpg20230215_000640.jpg
 
For a "make a movie poster in Photoshop" assignment:

I tried to blend a take on the modern "floating head" style movie poster, with an aesthetic that would still jibe with some of the show's 90s VHS tape box art.

EnM6NiV.jpeg
 
This is a multi-parter. To make using my CZUR scanner easier I wanted to get rid of the long cables I had to untie each time and plug in, so I made up a little box to provide the 9V power on the desk and an small adapter cable. This is the outlet, it's stuck to the top of the audio mixer so it's out of the way but easy to access. The cable is just a short length with male barrel plugs on each end.


For the USB cable, I wanted a right angle with a micro USB socket on the end so I can use a cable I always have plugged in. Turns out that they don't make those, so I had to make my own. The cable started as a USB B to B right angle extension, the second one I bought because apparently left and right hand angles are different depending on which way up the manufacturer has the USB B plug in the pictures...

I ripped the USB B socket guts out, fortunately they came out cleanly.


I then soldered on one of the micro USB breakout boards I have and potted the whole thing back in with white 3D printer UV resin. I'm really pleased with how it came out, it's really solid. Both of these together make setting up the CZUR scanner so much easier.


Having the 9V power right there on the desk is very handy as I've bought a guitar effects pedal to mess around with, it uses 9V but unfortunately uses reverse polarity so I needed to make a polarity flipper. I had all the bits around so made my own. Because of what it does, it needed an obvious name.


I'm getting closer to completing another project I haven't mentioned, which involves red lights and an Arduino.
 
This empty race fuel can that I "borrowed" (stole) from WSBK years ago when they raced in Utah has been kicking around my shop and shed for years. I'd thought about using it as a table since it had a solid lid, but then I stopped being 25.

Today I said "fuck it" and cut the top out to make it the new shop trash can.
PXL_20230423_202445978.jpg
 
Last edited:
Curious what method you used, @Blind_Io ?

I've got like 50 barrels I need to turn into trash cans for the track. Previously I've used a janky "can opener". It sucks, is time consuming, wears my ass out to use, plus it leaves it jagged. That makes it difficult to remove the bags. I've seen a method that uses a grinder to basically grind away the crimp at the top, until the lid is loose. I plan to try that next time.
 
Cutoff wheel around the edge with a downward cut inside the rim, angle grinder with a flap wheel to clean it up, smacked it with a hammer to push the edge back against the inside of the can.

Pretty much the most redneck way possible.
 
This one has been sitting for ages with the bungs open, zero risk of a fire.
 
Rodger dodger. Some of these had fuel in them, nervous to do anything with sparks, unless I fill it mostly with water first.
Would filling it with CO2 or nitrogen be a possibility? I have no idea if it would work, nor do I know of a reason why you might have spare inert gas like that... 😅
 
For this drawing class assignment, we had to take a photo (I chose this photo of Nick Cave of Nick Cave and the Bad Seeds), draw an even/straight square grid over it, then draw a new grid with all skewed lines, and replicate the individual squares' contents from the photo by drawing in the deformed squares of the skewed grid.

17 assignments in, and I think I am finally halfway sorta understanding charcoal, but I still hate it. Ha! I think I might need to try this drawing again with just a straight grid. That technique was actually pretty helpful, I think.

I'm most satisfied that, in spite of the misshapen face, he still appears to have both eyes facing the right direction. 😅

1682317823013.png
 
Would filling it with CO2 or nitrogen be a possibility? I have no idea if it would work, nor do I know of a reason why you might have spare inert gas like that... 😅

I've heard of people hooking a hose to a vehicle's exhaust and filling the barrel with carbon monoxide to prevent an explosion, but haven't tried it myself.

Most of the barrels once held the glue we already on the track, the remaining sticky stuff is flammable as well.
 
Top