So 2500 miles on the new engine so far, and absolutely nothing has gone wrong with it since fixing the roller rocker pedestal at the 200 mile mark.

The engine feels like it is making more power almost every single time I drive it. Not long after my last post, around 1000 miles, the engine had a noticeable drop-off in power at 5600 rpm, but now that I'm up to 2500 miles, and its a bit warmer out, the engine pulls hard all the way to 6000 or so.
I still haven't had time to remake the throttle middleman arm either, so the secondaries on the Q-jet are still only opening about 65% of the way. When I fix that, it's going to make even more power.
Neither have I been able to fix the exhaust leak. When I was hoping to fix it before, that was defendant on me having access to a lift at a friends workplace over the weekend, sadly, I was not able to work in that shop, and pulling the headers is not a job I can really do in a parking lot, so I've just been dealing with the leak (it's not so bad now)
Here's a few pics I have taken over the last 1500 miles:


and a panorama: (click for 5760x1080)

I'm going to be going home for this weekend, as it's the end of finals, and I hope to fix the exhaust leak, remake the throttle middleman arm, and install my two latest purchases, a oil separator tank, and hood-pins. The separator tank is necessary as my valve covers do not have baffles in them, and there's quite a bit of oil misting coming out of the breathers. It's making a real mess, and I don't want to just send all that blow-by down the intake, as it'll carbon up everything. The tank is an eBay special, but it should suit my needs well. I'll take some pics of the install and do a writeup.
The hood pins are necessary as my hood, like most hoods back then, is only latched in the center. The design of the front of the car is such that the hood acts like a scoop, and catches lots of air under it. At higher speeds (like the 80-85 mph I can now comfortably cruise at) the hood catches enough air that it's causing the outsides of it to flex a lot while driving. Not only is this annoying, but I am very concerned about the metal fatiguing around the latch, and eventually failing; hence, hood-pins. The pins I bought are standard cheap universal ones, that are supposed to replace the latch, and the rubber bumpers the hood rests on, entirely. I won't be doing that though, I'm going to do some custom work with them to retain the latch and rubber bumpers, to constrain how far down the front of the hood goes, and use the pins to constrain how far up it can go. If it works out as I envision, it'll be a pretty slick setup I think, and bad-ass looking to boot.
Now, as I said, Absolutely nothing has gone wrong mechanically with the car in the last 2500 miles, but I don't really consider the gauges, and the instrument cluster, to be something the car mechanically relies upon, and plenty has gone wrong in that department.

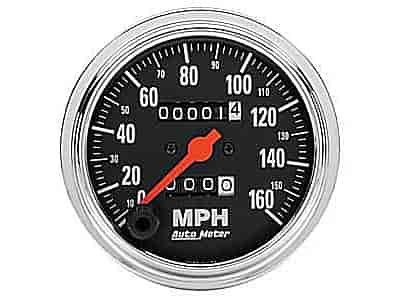
First up was my brand new Stewart Warner speedometer, PN 550DP. at exactly 1000 miles, the odometer broke. The speedo still registered speed, and the tenth of a mile indicator (0.1) on the odo still rolled, but the internal gears stripped, and it stopped counting miles. The part was replaced under warranty by Summit Racing and Stewart Warner. The new speedo had a different color housing, and I had the impression that it was a bit more... "sturdy".
It wasn't.
In fact, it was worse.

This time, it broke at only
100 miles. 100 miles, that's it. The exact same problem. again.

Needless to say, I was not pleased. Not pleased at all.
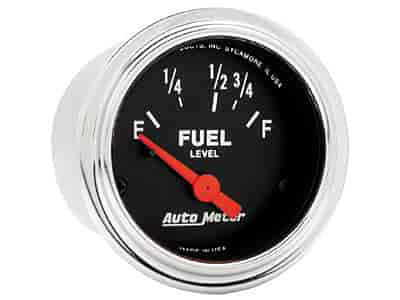
I got on the phone with Summit racing, described the issue, and my extreme dissatisfaction with it. I told them I wanted to switch to Autometers, and return both Stewart Warners (even though the fuel gauge was actually fine) and they approved a full refund for me.

My
Autometer 2494 Speedometer
and
Autometer 2515 fuel gauge
arrived 2 days later. I installed them in my wood dash, and I've been happy ever since. Well, mostly happy.
You see, the fuel gauge does not wobble around, instantly showing the exact position of the float like the SW fuel gauge did, which is very good, BUT the Autometer fuel gauge is designed to work with the OEM factory fuel sender, which is non-linear from 10 to 73 ohms.
My fuel sender has apparently been replaced with a aftermarket 10-73 Ohm replacement. Every single aftermarket sender, as far as I can tell, is linear from 10-73 Ohms
This means my new Autometer fuel gauge is only accurate at Full and Empty. everything in-between is wrong.
Autometer says the solution is to change the fuel gauge to one that is designed for 240-33 ohm senders, and get a matching sender for my fuel tank.
I don't like the design of the universal senders I can find, and the only sender I can find that fits my specific tank is the linear 10-73 Ohm replacement.
Basically, according to Autometer, I'm up shit creek, because I drive a Ford that's not a Mustang.
Obviously I don't like that option, so I've been doing lots of google work, and I found some forum posts (
HERE and
HERE) that talk about a fix. I need to place a resistor of the correct value between the sender and the ground posts on my gauge, and thanks to Ohms law, and the peculiarity of resistors in parallel, this will
sort of replicate the original non-linear fuel sender, at least closer than it is now.
The resistance values provided in those two posts seem to be specific to 22 gallon or 16 gallon fuel senders, and my Fairlane, of course, has a 20 gallon tank.
I just need to find out what my specific sender is reading at full, half and empty, and I have an excel spreadsheet setup that will calculate the resistor I need.
It's not quite annoying enough for me to go out there, drain the tank, and fight the sender out so I can measure it's resistance values at certain positions yet, so the fix will be waiting a while
For now, I'll just deal with the fact that when the gauge is reading that I only have 1/4 tank left, what it really means is that I am almost down to a half tank.
Now, as I've posted in the past, I took a CNC milling course this semester at school, and in that course, we learned about sand-casting aluminum. I needed a final project for the class, so I decided to cast a new instrument cluster, and mill the cast piece to accept standard gauges.
I started by making the cluster in Autodesk's Inventor:

this is after several revisions, and around 60+ hours of reverse engineering/modeling. This cluster would also reuse the original clusters idiot lights, as well as the originals method of lighting up the HVAC controls; using a peice of clear plastic, with the labels screenprinted on it that's illuminated indirectly from the side. This design is set up to make use of the original plastic.
then I created a CAD casting pattern based off of my CAD model of the cluster:

which was then cut into 5 separate CAD models (just one pictured)

and then I 3D printed all 5 pieces using the small RepRap printer in the CNC Lab: (the school has 2 big printers, but they were both in use, and the line was too long)

I used about 80% of a $25 roll of PLA plastic to print everything
I then epoxied all 5 pieces together:

and used sheet-rocking plaster to smooth it all out, and make it so the pattern could be cleanly pulled from the sand (I forgot to take a pic, so here it is after I pulled it out of the sand):

I then (having already made my 2 piece casting flask) began the long and tiring process of pounding sand:

This was going well, right up until the point when I was going to separate the two halves of the flask, and pull the pattern out leaving a cavity for the molten aluminum to fill.
Keep in mind, that with both halves together, there was around 250 lbs of sand in the box,
at least
when I pulled the top half of the flask off, it pulled nice and straight, BUT it left ALL THE DAMNED SAND IN PLACE!
The mold was ruined.
I was livid.
It took me more than 4 hours to pack all that sand. To perfectly pack the top and bottom (the top twice due to the nature of how this type of mold is made) and ensure that the separation lines would be in good places.
it was a major time investment, and the next day was the last day the professor would do any casting for the semester.
On top of the mold failing, as I was packing the sand, the plaster started to chip, and crack. I knew I would only get one chance to pack it, and when I pulled the pattern out of the failed mold, I found that the epoxy had broken along the thin walls.
I ended up not being able to cast the dash insert at all. My professor still gave me a 100% grade on the final project, since I did make
something, so there is that at least.
I'm going to use this opportunity though to redesign, and come up with an even cooler dash insert that beyond looking even better, would be easier to cast (if harder to machine)
here's where my thoughts are now:

Anyways, This has been another long update, with far too many words, SO I have a video that I made today. It's kind of long too, but I have the cliffnotes with timehacks listed on the youtube description, and I'll list them here too in fact, I'll post the whole description:
The beginning acceleration (00:18), and the u bend wheelspin (27:33), where the back of the car gets slightly sideways are the best bits I think.
Also, keep in mind that the gearing on this car is so long that I am shifting into second at just over
70 mph...
Youtube said:
Driving SR143 (Parowan Canyon) and UT049 (Yankee Meadows Road)
Starting at the base of SR143, I drive up to the road to the Yankee Meadows intersection. I drive on UT 049 to the end of the pavement, before returning to SR143, and continuing up SR143 to Brian Head resort.
00:00 - 00:18 - Startup
00:18 - 00:50 - Acceleration
02:10 - 09:52 - Driving up Yankee Meadows Road (at 8/10ths)
09:52 - 10:10 - Proper muscle car style U-Turn
10:10 - 19:54 - Slow Cruise back to SR143
19:54 - 23:15 - Acceleration to cruise speed, then Cruise up SR143
23:16 - 28:33 - Most interesting part of SR143; Lots of twists, turns, and steep hills. beautiful scenery. U bends with wheelspin from 27:33 to 27:57
28:33 - 31:32 - Driving through Brian head Resort
Car is a 1967 Ford Fairlane 500 4-door, with a recently rebuilt 302 in it. engine has just under 2500 miles on it at this time.
Carburetor is a 1983 Chevy Quadrajet
Intake is a Summit Stage 1
Cam is a Comp Cams N+271 Nostalgia Plus, with ProComp Roller rockers
Self ported 1979 302 Cylinder heads (~9.0:1 compression)
Patriot long tube headers
Smithy 30" glasspacks exiting in front of the rear tires.
1965 Close-Ratio Toploader 4 speed transmission (never rebuilt afaik) with Hurst Comp+ shifter (period piece, also never rebuilt)
2:79:1 rear differential
6000 RPM shift points
Filmed with an original GoPro Hero, Audio from an Audio-Technica ATR3350 mic, clipped vertically to the rear licence plate.

 WTF! If that was true, then no wonder I was having vibration issues.


